Alright, gamer! You’ve come to the right place for all things *Pragmata*! It’s fantastic to see you diving into Capcom’s latest sci-fi adventure, which just landed on April 17, 2026, for most platforms, with the Nintendo Switch 2 version in Japan and Asia following on April 24, 2026. Get ready to explore that crumbling lunar research station with Hugh and Diana!
You’re asking about collectibles in Sector 1, which is known as the **Solar Power Plant**. This sector contains a total of **15 collectibles** that are crucial for trophies and 100% completion. Remember, nothing is missable in *Pragmata*, as you can always return to areas after the story in “Unknown Signal Mode” (also referred to as “Cleanup Mode”) to grab anything you missed. This is especially important because some collectibles require abilities unlocked in later sectors, such as the “Lim Eraser” from Mass Production Array 05 (Sector 2).
Here’s a detailed breakdown of all the collectibles in Sector 1: Solar Power Plant, categorized by their sub-locations:
### Sector 1: Solar Power Plant Collectibles Overview
The Solar Power Plant is divided into several blocks, and you’ll find the following types of collectibles:
* **Mini Cabins:** 3
* **Escape Hatches:** 3
* **Safe Boxes:** 3
* **Pure Lunum:** 1
* **REMs (Read Earth Memories):** 2
* **Mods:** 1
* **Storage Expander:** 1
* **Cartridge Holder:** 1
### Collectible Locations by Area:
#### 1. Generator Entrance
* **Storage Expander 1:** This collectible **requires backtracking** with the **Lim Eraser** ability, which you’ll obtain automatically in Mass Production Array 05 (Sector 2). Once you have it, return to the Generator Entrance, use the Lim Eraser to clear the blockade in a specific door, and you’ll find the Storage Expander inside.
#### 2. Power Distribution Center
This area is particularly rich in collectibles.
* **Escape Hatch 1:** You’ll encounter this one directly on your main story progression path, making it unmissable.
* **Safe Box 1:** In the area where you need to unlock five locks, drop down on the left side of the large door. Go up the elevator, then head to the right corner and drop down into an area with a dark floor. The Safe Box is located behind some movable platforms there.
* **Mini Cabin 1:** From the same general area as Safe Box 1, go back to the door with five locks. Drop down to its left, go up the elevator, but this time head to the left corner. Enter the tunnel next to one of the door locks. Be prepared for a fight, as the tunnel will lock off until you defeat a large and small enemy. Exit the tunnel on the other side, and the Mini Cabin will be on your right. Remember to shoot Mini Cabins to destroy them and collect them.
* **Pure Lunum 1 + Safe Box 2:** These two collectibles **require backtracking** with the **Lim Eraser**. The specific location details for these are often tied to clearing a Lunafilament blockade.
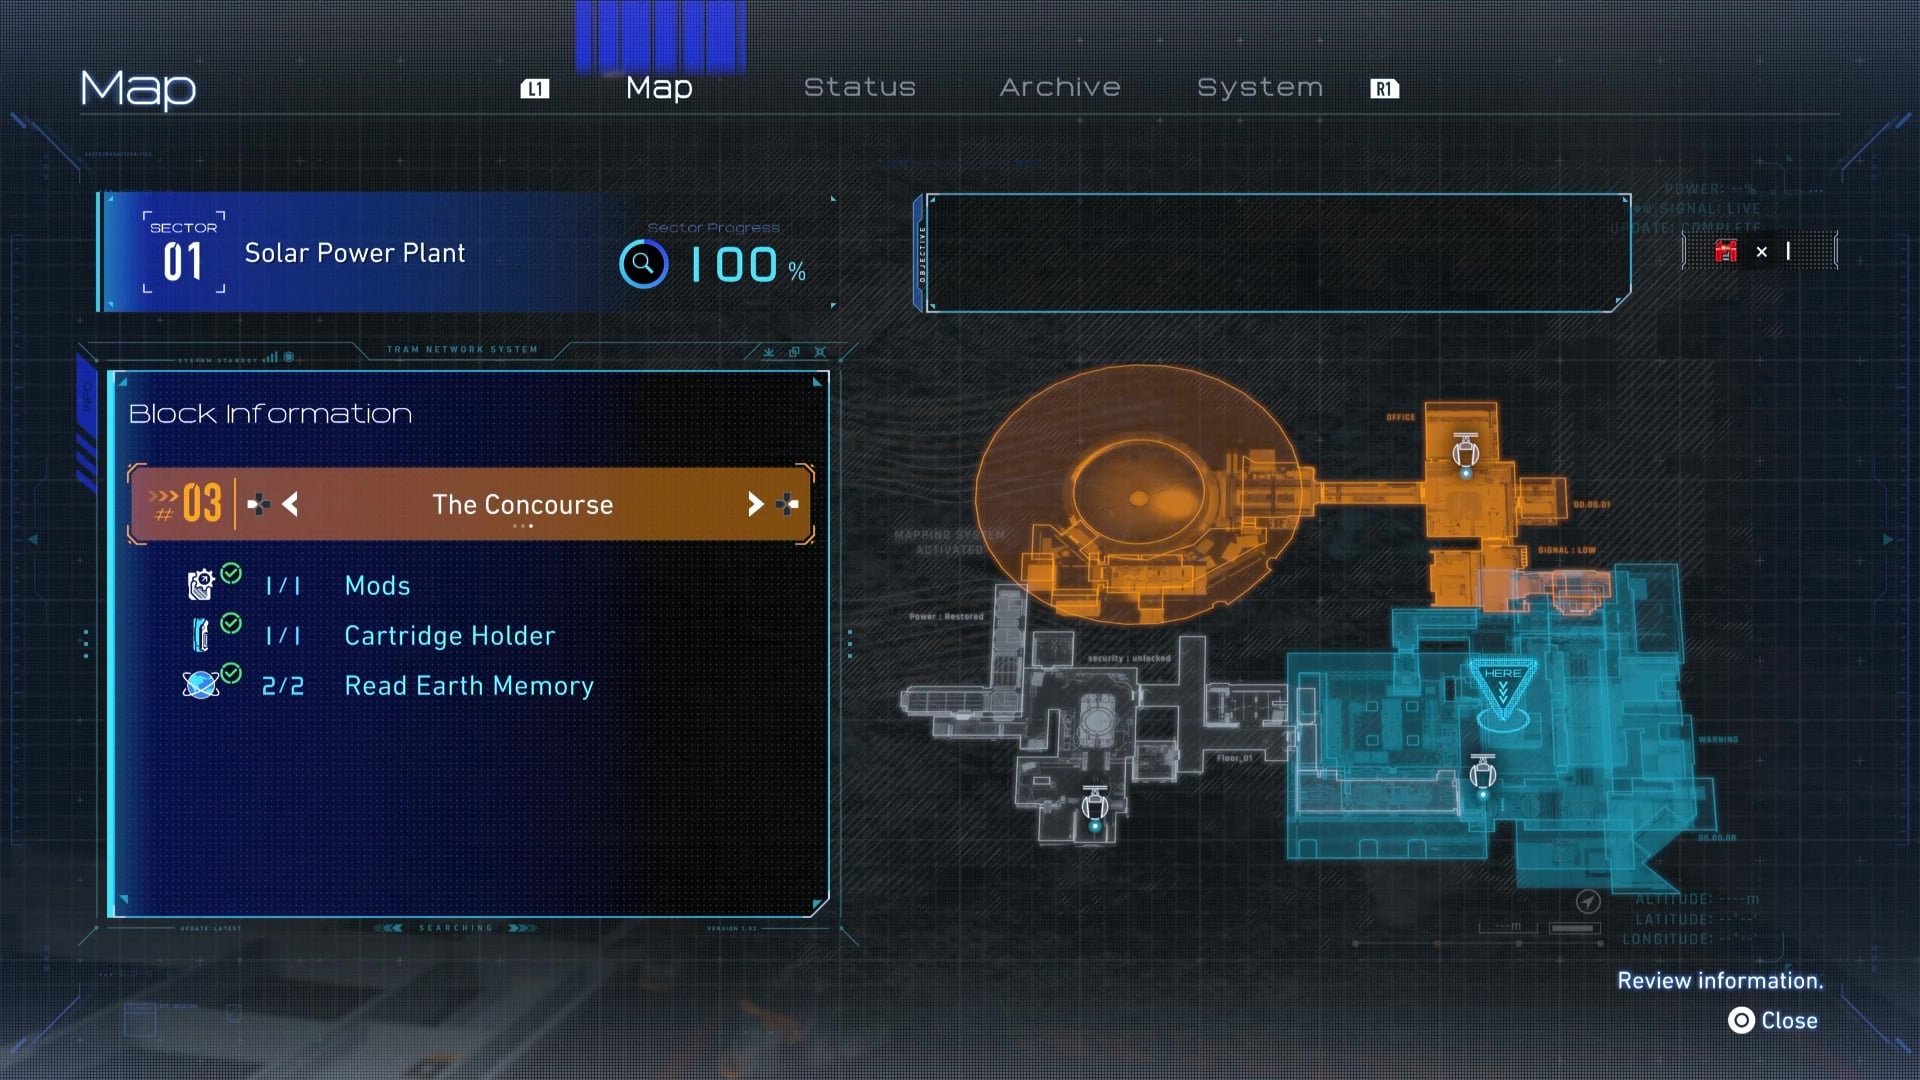
#### 3. The Concourse
* **REM 1 (Globe):** This collectible is obtained automatically after a cutscene involving Diana and a globe. Hugh will explain the globe to Diana, and this marks your first “Read Earth Memory”. These REMs can be printed at the Shelter as presents for Diana to deepen her understanding of humanity.
* **Mini Cabin 2:** In the same room where you get REM 1, look for an empty bunk cabin with a net in front of it; the Mini Cabin is inside.
* **Escape Hatch 2:** You will run straight into this collectible shortly after the previous ones in The Concourse, making it hard to miss.
* **Mod 1 (Hardened Suit):** This Mod can be found in a box located next to an Escape Hatch.
* **Cartridge Holder 1:** In the room to the left of the aforementioned Escape Hatch, you’ll find this Cartridge Holder.
* **Mini Cabin 3:** After obtaining the first decode and defeating an enemy, you’ll find this Mini Cabin on a vent next to the zipline that takes you up. It’s on the wall vent halfway up the zipline.
* **REM 2 (Crayons):** After defeating the Sector Guard in Sector 1, you’ll be transported to the Shelter. You’ll need to return to this area. Once you’re back, head to the top of an elevator, jump onto a small platform on the right, and interact with a wall. Go straight through to the back to find the crayons.
* **Escape Hatch 3:** This Escape Hatch appears at the top of the elevator in the area where you fight the first boss. You must return to this specific location *after* the boss fight for it to appear, as you are automatically transported to the Shelter immediately after the boss.
### General Tips for Collectibles in Pragmata:
* **Listen for the Glow:** Mini Cabin Figures emit a distinct sound when you’re nearby, and they also have a telltale blue glow, so keep your eyes and ears peeled.
* **Scan, Scan, Scan!** If you’re ever lost or unsure where to go, use your Scan ability. It will create a waypoint to guide you to your next objective. While the in-game map shows your current block, the “HERE” marker isn’t always precise, so scanning is your best friend for navigation.
* **Backtracking is Key:** As mentioned, many collectibles are locked behind abilities you gain later. Don’t fret if you can’t reach something on your first pass. Make a mental note or mark it on your map and come back once you’ve acquired new skills like the Lim Eraser.
* **Upgrade at the Shelter:** Whenever you hit a tram stop, Diana will often suggest taking a break at the Shelter. This isn’t just for story progression; it’s your opportunity to use the Lunafilament currency and upgrade components you’ve found to enhance Hugh and Diana’s abilities. The Shelter is also where you can fully heal and restore your Cartridges.
* **Talk to Diana:** Hand over any Read Earth Memories (REMs) you find to Diana at the Shelter. This unlocks new, often heartwarming, interactions and helps her learn more about humanity.
Happy hunting, spacefarer! May your collectible journey be filled with thrilling discoveries and successful hacks! If you have any more questions about *Pragmata* or any other game, just ask GameJinn!


Leave a Reply