
Installing mods for Beat Saber on PC using ModAssistant can significantly enhance your gaming experience. Here’s a comprehensive guide to help you install and manage your mods seamlessly.
Preparing Your Environment
1. Run Beat Saber At Least Once:
Before diving into modding, ensure you have launched Beat Saber at least once. This step helps avoid version conflicts and allows the game to be ready for mod installations.
2. Locate Your Game Folder:
You need to identify the directory where Beat Saber is installed. Depending on your platform, you can find it in the following common locations:
– Oculus: `C:\Program Files\Oculus\Software\Software\hyperbolic-magnetism-beat-saber\`
– Steam: `C:\Program Files (x86)\Steam\steamapps\common\Beat Saber\`
Installing ModAssistant
1. Download ModAssistant:
Visit the official ModAssistant repository on GitHub. Find the latest version of `ModAssistant.exe` in the releases section and download it.
2. Run ModAssistant:
Place the downloaded `.exe` file in a convenient location on your PC. ModAssistant does not require installation—simply run it directly to get started.
Setting Up ModAssistant
1. Locating the Game Folder:
Upon launching ModAssistant for the first time, it will attempt to automatically locate your Beat Saber installation. If it fails to find the game, you will need to manually input the installation path.
2. Agreeing to Terms:
You will encounter a prompt asking you to agree to the terms of use. Take a moment to read through these terms to ensure you understand the guidelines for modding.
Installing Mods
1. Select Mods:
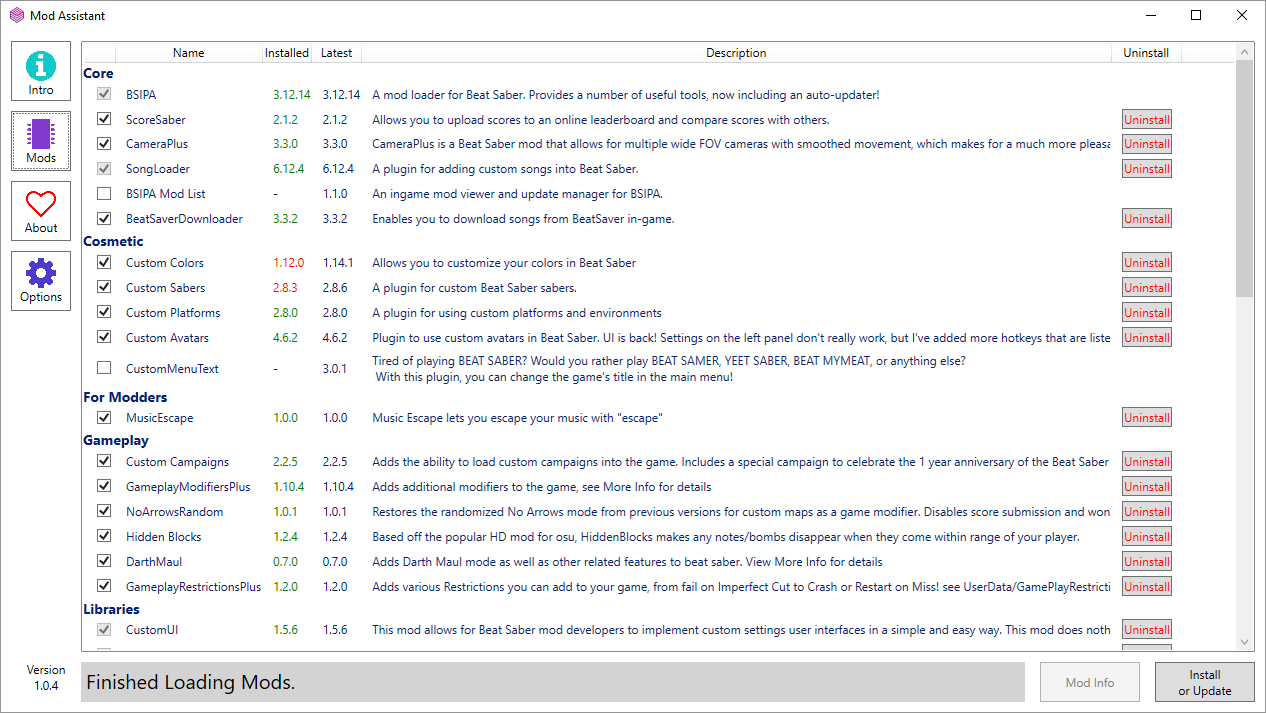
After agreeing to the terms, you will see a selection of available mods. Core mods are pre-selected by ModAssistant, but feel free to explore and select additional mods that interest you. Click on the “Mod Info” button to learn more about each mod’s features and functionality.
2. Install Mods:
Once you have made your selections, click on the “Install or Update” button to initiate the mod installation. It’s advisable to install mods gradually, which helps prevent potential issues from overloading the game with new features at once.
3. Boot the Game:
To finalize the installation process, launch Beat Saber once more after installing your mods. This step is crucial to ensure that the mods are fully integrated and functional.
Managing Mods
1. Uninstalling Mods:
If you wish to remove any mods later, you can do so easily. Simply select the mod you want to uninstall in ModAssistant and click the “Uninstall” button.
2. Updating Mods:
To keep your experience current, regularly check for updates to your installed mods. Select the mods you wish to update and click the “Install or Update” button to apply the latest changes.
Common Issues
– Dependency Resolution:
ModAssistant handles dependencies between mods automatically, simplifying the process of managing complex mod setups.
– Theme Customization:
One of the exciting features of ModAssistant is its support for custom themes, which allows you to alter the visual aesthetics of the game to better suit your preferences.
By following the above steps, you can effectively install and manage mods for Beat Saber on your PC using ModAssistant. Enjoy the enhanced gaming experience that mods can bring!


Leave a Reply