
To effectively engage and defeat fast enemies such as the Lone Shadow Longswordsman in Sekiro: Shadows Die Twice, players must adapt their strategies to emphasize aggression, precise defensive maneuvers, and the tactical use of the environment. Here’s a detailed breakdown of the key strategies:
1. Embrace Aggression
– Stay Close: Unlike the defensive playstyles common in other FromSoftware titles, Sekiro encourages a more aggressive approach. By getting close to the Lone Shadow, you can maintain consistent pressure, effectively building up their posture bar. This aggressive strategy not only heightens your chances of breaking their posture but also opens up opportunities for various death blows.
– Continuous Pressure: Regularly attack the enemy, which makes it difficult for them to retaliate effectively. Keeping them on the defensive increases your chances of creating openings for swift counterattacks.
2. Perfect Deflections
– Master Timing: Successful deflections are critical in battles against nimble foes. Practicing your timing for perfect deflections will yield sparks, enhancing the damage to the enemy’s posture. These perfect deflects can quickly lead to breaks in their posture, providing you with the opportunity to unleash powerful counterattacks.
– Punish Mistakes: Anticipating enemy attacks and perfectly deflecting them not only aids in your defense but also serves as a method to regain control over the tempo of the fight.
3. Utilize the Environment
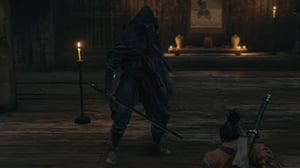
– Cramped Arena Navigation: The battle against the Lone Shadow Longswordsman occurs in a tight space with stairs and ledges, which you can use to your advantage. Grapple points can create verticality in your maneuvers and help reset the engagement if the fight becomes overwhelming.
– Camera Management: If you find the camera becomes problematic, momentarily retreating gives you a chance to reset both your positioning and the enemy’s focus. This can be particularly useful if you’re getting cornered during combat.
4. Ranged Tools and Tactics
– Shurikens: Utilize shurikens strategically when you need to regain distance. They can chip away at the Lone Shadow’s health while giving you time to reposition. Jumping without targeting can create safe openings for attacks, preventing you from being too predictable.
– Engage from a Distance: Although close engagement is vital, sometimes stepping back to assess the battle or use ranged attacks allows you to regain control and set up for further close-quarters engagement.
5. Posture Management
– Blocking and Recovery: Be aware that blocking enemy attacks can increase your own posture, but you can recover quickly by holding the block button. Continual deflections can mitigate posture damage, allowing you to stay in the fight longer without being overwhelmed.
– Manage Posture Carefully: Always keep an eye on your posture gauge. Staying aggressive helps keep your posture low while pushing the enemy’s posture higher.
6. Maintain Awareness
– Avoid Environmental Hazards: Be mindful of your surroundings. Enemies like the Lone Shadow can push you against walls or off cliffs, leading to potentially disastrous situations. Use your grappling hook to maneuver vertically and avoid getting pinned into corners.
– Edge Proximity: Hugging edges during fights can keep you safer and allow for easier escapes when necessary.
Conclusion
In summary, the fight against fast enemies like the Lone Shadow Longswordsman requires a blend of aggressive attacks, perfect deflections, intelligent use of the environment, and diligent posture management. Mastering these elements will enhance your chances of success and lead to a rewarding combat experience in Sekiro: Shadows Die Twice. By combining these strategies, you can overcome the challenges presented by such agile foes and emerge victorious.




Leave a Reply