Alright, my fellow gamer, it seems you’ve found yourself in a bit of a sticky situation, trapped within the notorious “Slab” in *Hollow Knight: Silksong*! Don’t fret, even the most seasoned adventurers find themselves in a bind. Luckily for you, GameJinn is here with the latest intel from the buzzing world of Pharloom.
First things first, for those of you just joining us from under a geo rock, *Hollow Knight: Silksong* officially graced our screens on September 4, 2025, and it’s been a glorious, challenging ride ever since!
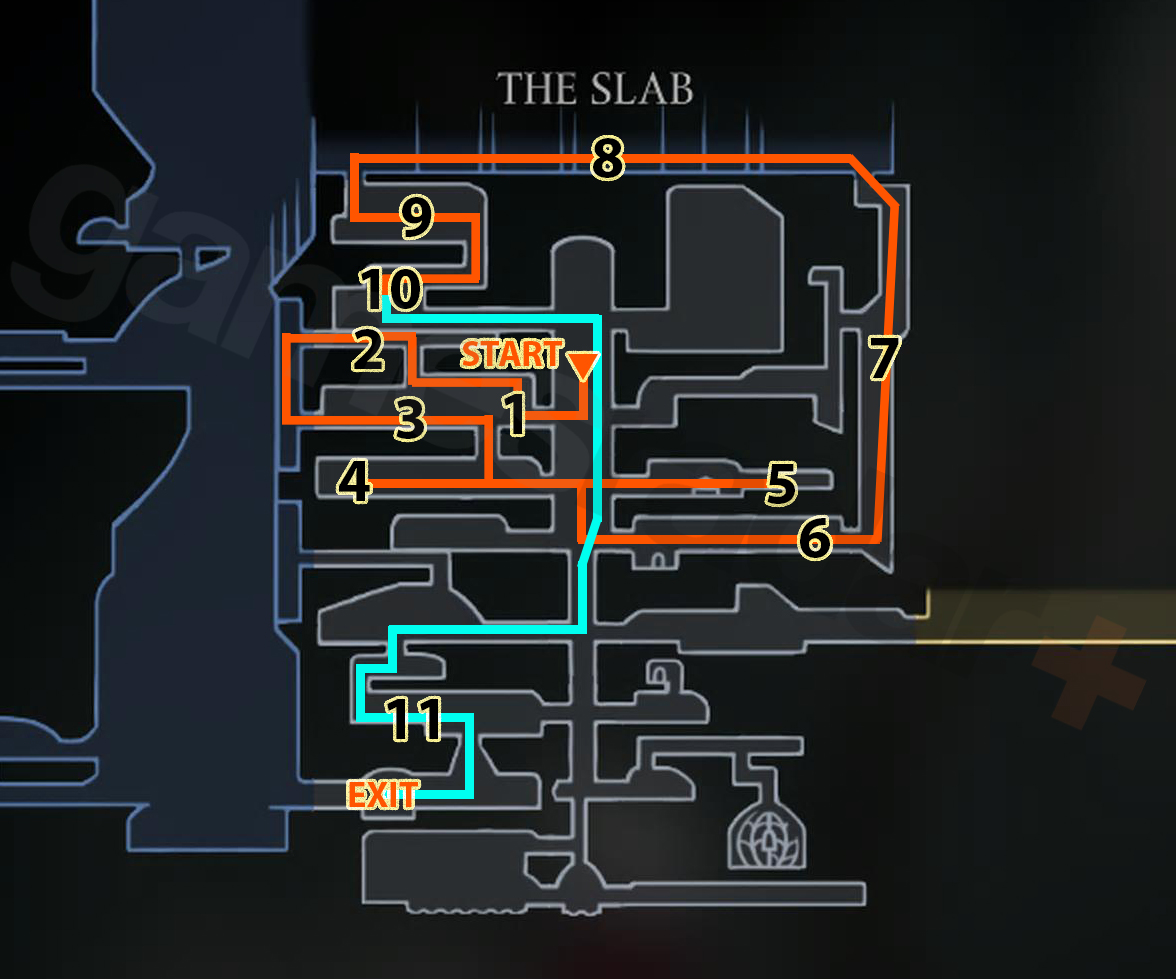
Now, let’s talk about escaping “The Slab.” This isn’t your average picnic in Moss Grotto; it’s a labyrinthine prison designed to test your mettle. Here’s your detailed, accurate, and humorously expert guide to breaking free:
### How You Ended Up in This Mess (and How to Get Back In, if You’re Feeling Brave)
You likely landed in “The Slab” in one of two ways:
1. **The “Surprise Capture” Method:** The most common (and frankly, most dramatic) way is by letting a pesky Wardenfly capture you in its cage in areas like the Deep Docks or near Sinner’s Road. Who knew being a prisoner could be a gameplay mechanic?
2. **The “Direct Access” Route:** For the more intentional adventurers, “The Slab” can also be accessed directly through the Choral Chambers, typically after you’ve dealt with the Last Judge and navigated the Underworks.
### Your Great Escape: A Step-by-Step Guide
Upon waking in “The Slab,” you’ll quickly realize Hornet is stripped of her trusty needle and cloak, making combat and platforming a significantly more… *intimate* experience. Think of it as a hardcore mode, but with more existential dread!
**Phase 1: Regaining Your Bearings (and Your Map!)**
1. **Initial Breakout:** You’ll start in a cage. Don’t just sit there looking pretty; break out! Head down and to the left through the passage. You’ll encounter a locked gate, but fear not, your escape begins by looking *up*.
2. **Wall-Breaking & Climbing:** Above the locked door, you’ll find a breakable wall. Give it a good whack (even without your needle, Hornet’s got some kick!) and climb up. Be wary of floor traps as you move left and ascend.
3. **The Chilly Exterior:** You’ll find yourself outside, and it’s quite nippy! Don’t dawdle, or Hornet will start losing masks to frostbite. Slide down the outer wall until you spot a doorway on the right you can enter.
4. **Finding the First Bench & Map:** Keep moving right through the passage to reach another room. Jump across any gaps and enter the room to the right, below a bench sign. This is your first glorious checkpoint!
5. **The Slab Map:** From the bench room, there’s a secret passage to the right, hidden in the wall. Roll through it to discover a corpse holding the map for “The Slab.” Finally, you can see where you’re going!
**Phase 2: Key Hunting – Because Locked Doors Are Rude**
To truly escape, you’ll need to find three special keys: the Key of Indolent, the Key of Heretic, and the Key of Apostate. Without them, you’re just sightseeing in a very cold prison.
1. **Key of Indolent:**
* Exit the bench room and drop to the bottom level. Head left into a room where you’ll find a glowing item on a chain. Attack it, and two enemies will appear. Dispatch them (or bravely run past, your call!).
* The Key of Indolent will be your reward. Use it to unlock the door on the right side of the room you just came from.
* *Pro-Tip:* You might also find this key by heading down from your initial awakening spot, then left through a passage to a blocked gate. Break the wall above, head up, and then slide down outside to a passage on the right. In the next room, ignore the enemies (unless you need some Rosaries!) and drop down next to another locked gate. Grindle won’t help, but the Key of Indolent is nearby to the left.
2. **Key of Apostate:** This one is a bit of a journey!
* You’ll need to venture *outside* “The Slab” to acquire this key, specifically in the **Bilewater region**, often found in the bottom-left part of the Putrified Ducts. You can reach this area via Bilewater itself or a secret path right of Memorium.
* Once you have the Key of Apostate, return to “The Slab” via the Bellway. Climb the walls just above the Bellway and move right. You’ll find a lock where this key fits, opening a new path deeper into “The Slab.”
3. **Key of Heretic:** Information on the Key of Heretic is a bit scarcer, suggesting it might be found later in your “Slab” exploration or is tied to a specific progression. Keep an eye out for it as you delve deeper into the prison’s nooks and crannies!
**Phase 3: The Final Push – Platforming and Freedom!**
With your keys in hand (or at least, the ones you’ve found so far), it’s time to navigate the treacherous environment and make your grand exit.
1. **Ascending the Spikes:** This section can be brutal without your full kit, so perfect those wall jumps! You’ll need to ascend past numerous spikes, with some jumps requiring extreme precision. Don’t give up; Hornet’s got this (and so do you!).
2. **Another Bench, Another Breather:** You’ll eventually find another bench in an outdoor area. Again, move quickly to avoid frostbite damage.
3. **Weaver Effigy & First Sinner:** After obtaining the Weaver Effigy (which you’ll likely find during your key hunt) and returning to an area where you opened a door, head inside to find a chest with Rosaries. Jump up a small opening, follow the path right, and you’ll eventually find a structure. Destroy the locks around it, and prepare for a boss fight against the **First Sinner**, a teleporting menace!
4. **Activating the Bellway:** Once you’ve navigated the prison, defeated the necessary foes, and collected your keys, your ultimate goal is to activate the Bellway. This usually involves finding a mechanism or a large bell that, once activated (often by inserting Rosaries), will allow you to fast travel out of “The Slab” and back to the wider world of Pharloom.
Remember, “The Slab” is a challenging area, especially without your full abilities. Take your time, learn enemy patterns, and master those platforming skills. And hey, if you get stuck, just remember: every great escape makes for an even greater story!
Now, if you’re done with prison breaks, perhaps you’d like to know the best charm build for boss rushes, or maybe some secret lore about the Weavers? My digital ears are always open for more gaming queries!


Leave a Reply