
Finding treasure using X-marked maps and visual island landmarks in Sea of Thieves combines navigation and observation skills, making it an exciting and rewarding gameplay mechanic. Here’s a comprehensive guide to mastering this crucial aspect of the game:
Reading X-marked Treasure Maps
1. Acquiring the Map
– Treasure maps can be obtained through various means, including:
– Quests (voyages) from Trading Companies
– Messages in bottles found on islands or the open sea
– Purchasing from Trading Companies directly
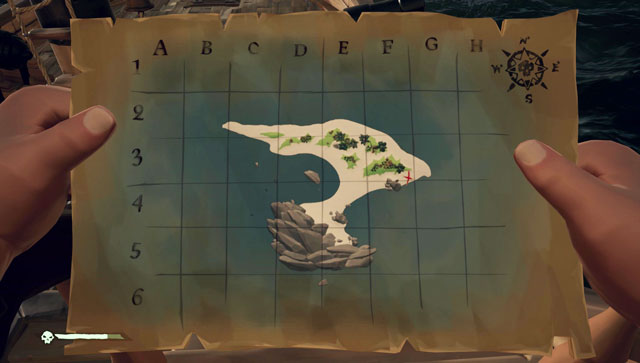
– Each map features hand-drawn illustrations of islands with one or more red Xs, indicating potential treasure locations.
2. Navigating to the Island
– Use your world map to identify the island depicted on your treasure map. The on-screen interface shows your current position relative to islands and outposts, allowing you to chart a course effectively.
3. Landing and Preparation
– When you reach the island, ensure you have your shovel and treasure map equipped, which can be accessed from your inventory or quest radial menu.
Locating the X on the Island
1. Map Orientation
– The map is oriented with north at the top. Use in-game compass directions (N, S, E, W) to align your position and the map effectively.
2. Identifying Landmarks
– Analyze the map for distinctive features like large rocks, unique tree arrangements, wells, ruins, or distinctive shoreline shapes. These elements aid in triangulating the position of the treasure marked by the X.
3. Overlaying Map Features
– The X may obscure smaller landmarks on the map. Move around and adjust your viewpoint to ensure you don’t miss any features that could help identify the treasure’s exact location.
4. Using the Compass
– Hold your compass to find cardinal directions, then navigate from a nearby landmark towards the X. Precision in counting paces can help if the X is located away from a prominent feature.
5. Digging for Treasure
– When confident that you are near the X, use your shovel to dig. A dull thud sound signifies you’re close, and soon enough, the treasure will be unearthed.
Tips for Success
– Familiarity with Islands: Repeated visits to islands help you recognize common landmarks and treasure locations more swiftly.
– Visual Clues and Repetition: If the X is not near a clear landmark, utilize surrounding natural features to guide your search. Treasure may sometimes be located in open areas requiring careful navigation.
– Team Coordination: Share the map with your crewmates for quicker landmark identification and efficient digging.
– Custom Maps: Players can also create their own treasure maps by burying treasure, allowing for diversified gameplay through map sharing and trading with other pirates.
Advanced: Custom Treasure Maps
1. Burying Treasure
– To create a custom treasure map, choose an island, use your shovel to bury a piece of treasure, and a custom map will appear in your quest inventory. This generated map only shows the island layout with the treasure marked.
2. Sharing Maps
– Custom maps can be shared with your crew. However, be cautious, as they can also be stolen by other players. These maps are stored as bundles, so it’s crucial to protect them.
Summary Table
| Step | Detail |
|———————|————————————————————————|
| Acquire Map | Get map from quests, messages in bottle, or from a trading company |
| Navigate to Island | Sail to the island using the world map |
| Use Compass | Align yourself with N at the top; use compass for cardinal directions |
| Match Landmarks | Compare features on the map with those in-game |
| Locate X | Overlay the map on island features; observe for obscured landmarks |
| Dig at X | Dig with shovel where you believe the X is; listen for the dull thud |
| Custom Maps | Bury treasure to create a custom map; keep it secure from theft |
By honing these skills and utilizing these strategies, treasure hunting in Sea of Thieves becomes a truly immersive and rewarding experience that depends on keen observation and good teamwork. Happy hunting!


Leave a Reply